Base Calibration
Primary Jets: 0.098"
Secondary Jets: 0.095"
Primary Metering Rod: 0.075" x 0.047"
Step-Up Spring: 4" Yellow
Idle: 850 RPM
Choked: 1200 RPM
Primary Jets: 0.098"
Secondary Jets: 0.095"
Primary Metering Rod: 0.075" x 0.047"
Step-Up Spring: 4" Yellow
Idle: 850 RPM
Choked: 1200 RPM
With the E303 cam and a carburetor, there will be some headaches, but it is completely do-able. If you don't believe me, do a Google search. Many people struggle with getting a smooth idle, and some may think it is a waste of time or impossible. Probably the people that are successful aren't really posting online, and what is posted are the people about to give up or don't want to troubleshoot. A Ford Racing Tech told me that I couldn't put a carburetor on this crate motor. After that I figured I was probably on my own for a lot of things and could make up the rest. It has worked for me so far. The E303 cam actually seems really well suited for a carburetor - with low end torque for a street car and I would take it over the B cam any day.
IDLE RPM
I chose 850 RPM because the engine is quiet (enough) and seems to idle stable regardless of ambient or engine temperature. It really doesn't even need the electric choke to start up nicely. If I remember right, I think that 87-93 Mustangs were somewhere between 800 and 950 RPM. The only reason I may raise this is because of the AC compressor clutch. AC is essential during the Florida summer, and I am not sure what speed the compressor needs to properly cool when the car is parked for awhile. My AC system is Frankenstein-ed and the only thing that resembles a factory setup is the compressor and bracket from a 87-93 engine. The AC works great in cruise, but I found out the other day it's not so great when sitting in a parking lot. The compressor and clutch is from a junkyard, so that may have something to do with it, and is on my list to check out.
THE FORD OEM TACHOMETER
I don't know whether it is my 30 year old tachometer in the instrument cluster, the MSD tach adapter, or the small RPM delineations on the tach face, but it is not accurate. It seems to be within 100-200 RPM and is responsive enough to use when driving, but it is a nightmare to set idle from. I would rather set idle by listening to the engine then use the tach in the dash. At the bottom of this page is my cheap tach solution.
|
First of all, If you are trying to tune a carb, do yourself a favor and that Owner's Manual that came with your carb, read it. Understand it. Sleep with it under your pillow. Read it again. Look at the pictures. You may get lucky and tune it perfectly, but I wouldn't bet on it unless you understand what you are doing or the carb is brand new out of the box. |
|
It will be a lot easier to use a vacuum / fuel pressure gauge. Tuning a carbed engine is a perfect example of an iterative process. Dial it in, change idle speed RPM, dial again, repeat. It also changes with the seasons, and ambient everything. Since this 1406 was previously installed on the original engine in about 2004, it wasn't new. At first, I had a surging, super lopey rich idle. This attracted a lot of attention, but that gets old fast. With this cam, there will be lope, but it is possible to tame it.
WHY AM I RUNNING SO RICH?
I noticed that fuel was dripping out of the primary venturi boosters. At first, you might suspect that the fuel pressure was too high. or that something was gunking up a passage somewhere in the carb. It turns out, if you are tuned way too rich, gas will bypass and drip out those boosters. After I did the things below, rebuilt and tuned it properly the dripping ceased. The rebuild may not have been necessary, but these next things stopped the drip before the rebuild.
Remove the two idle screws and clean them off with some carb cleaner. Blow out the passages that you removed them from with some compressed air and spray some carb cleaner in that passage.
There are two tiny tubes sticking straight up at each side of the airhorn. Spray them out with air and carb cleaner.
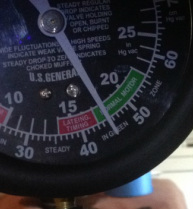
Turning the air crews should noticeably change the idle. If it doesn't, something else is wrong. When adjusting them, take note of the changes in rpm, the maximum vacuum being achieved, and the sound of the engine. Really, I think paying attention to where the vacuum reaches a maximum is what really helped the engine breathe right. About 18 inches of mercury from the manifold on idle is where I left it. It seems that most people can't achieve more than about 16" if they're lucky and they are fine with that.
At first, this thing only wanted to idle right above 900 RPM. After really getting the carb dialed in, I could get it to run and idle decently at about 600 RPM!
Remove the two idle screws and clean them off with some carb cleaner. Blow out the passages that you removed them from with some compressed air and spray some carb cleaner in that passage.
There are two tiny tubes sticking straight up at each side of the airhorn. Spray them out with air and carb cleaner.
Turning the air crews should noticeably change the idle. If it doesn't, something else is wrong. When adjusting them, take note of the changes in rpm, the maximum vacuum being achieved, and the sound of the engine. Really, I think paying attention to where the vacuum reaches a maximum is what really helped the engine breathe right. About 18 inches of mercury from the manifold on idle is where I left it. It seems that most people can't achieve more than about 16" if they're lucky and they are fine with that.
At first, this thing only wanted to idle right above 900 RPM. After really getting the carb dialed in, I could get it to run and idle decently at about 600 RPM!
THE ELECTRIC CHOKE IS ACTUALLY REALLY NICE
The choke doesn't really matter for tuning purposes UNLESS you are trying to get it right and the choke is closed. I found it hard to trust the electric choke. I understood its operation, but I didn't appreciate it and understand it fully until I did this:
You can do this without even running the engine. With the engine cold, take off the air cleaner and note the angle of the plate. It will be almost horizontal. Supply voltage to the electric choke, then stare at the plate. It will only take a minute or so, but you will actually see the plate move until it is vertical. This is when the choke has warmed up completely. For me seeing this solidified it for me, but also teaches a valuable lesson. There is a small window to use the electric choke if you want to use it as intended. Also, to use the choke, you have to set it by tapping the gas pedal before you turn the key.
-Maintain fuel pressure at close to 5.5 psi
-Try to get as much manifold vacuum as possible
-Tune until you think you should be done, and then tune some more
-Listen to the engine - After awhile it helps to step further away and listen from somewhere else

|
|
CARBURETOR HEAT SOAK
When choosing an intake manifold, I really planned out the mounting height so that I could maintain the original hood without a cowl. This counted out high rise manifolds like the Performer RPM, so I settled on the Performer. Even though the Performer manifold keeps the carburetor and air filter lower, it is still higher than the Ford OEM height, so I still had to do away with the carb spacer that was between the old 302 and the 1406. Having to do away with the spacer was something I sort of worried about, but it had to be done. With a drop air cleaner housing, I was able to get everything under the hood and to appear stock with the hood closed.
During tuning, I got to a point where if I didn't see the primary boosters dripping gas, I was seeing fuel boil out of the secondaries the more and more I played with it. I got sick of all this, and before I decided it was heat soak, I decided to rebuild the carb. The carb was installed on the original engine about 10 years ago, and was a daily driver for a few years and sat for a few years so a rebuild might have been necessary.
While I waited for the brown truck to drop off my rebuild kit, I rerouted all the fuel lines to keep them as far away from heat as possible. I rechecked the fuel pressure at the regulator, and also checked all the fuel filters.
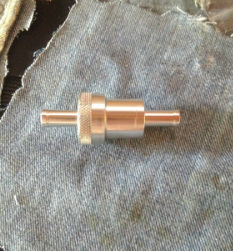
The filter in the picture was between the fuel tank and the fuel pump. I took out this aluminum filter and replaced it with a larger canister style that I had sitting around. After the carb rebuild, adding another base gasket, checking all the fuel fittings, rerouting fuel lines, and cleaning the glass fuel filter, all the problems in the carb were gone. I am still not sure what was the cause of the problem, but it doesn't matter anymore since it is solved. When I saw the fuel boiling out of the secondaries, it was a hot Florida day and the car was in a garage with the garage door open. It can get pretty hot in there and maybe that was the issue. Either way, I don't think I am going to use these aluminum filters anymore. The fuel pressure seems to fluctuate less since I swapped filters. A larger filter has a larger effective surface area and that means better filtering anyway.
THE INACCURACY OF HOT LIQUID-FILLED FUEL PRESSURE GAUGES
Liquid filled fuel pressure gauges that are reading less than about 7 PSI will be inaccurate after the liquid in the gauge face heats up. If you have an Edelbrock carb, you will be in this range, and after the gauge heats up, it will read low. This is heat soak to the gauge, but it won't affect the amount of fuel being delivered to the engine. The only way to deal with this is to remote mount the gauge outside of the engine bay, or bleed liquid out of the gauge so that it will read correctly at operating temperature. If you bleed liquid, it will be inaccurate when it is cold. I deal with this by only trusting the gauge when the engine has first started after being cold.
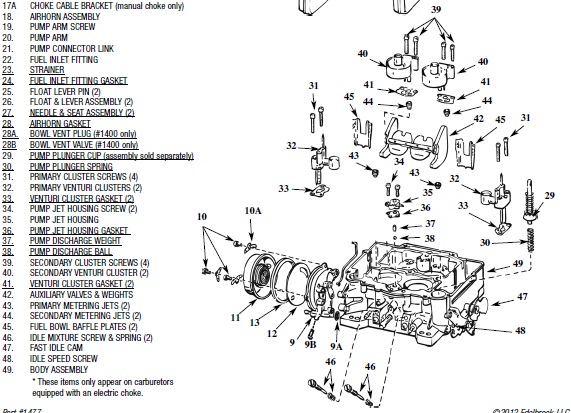
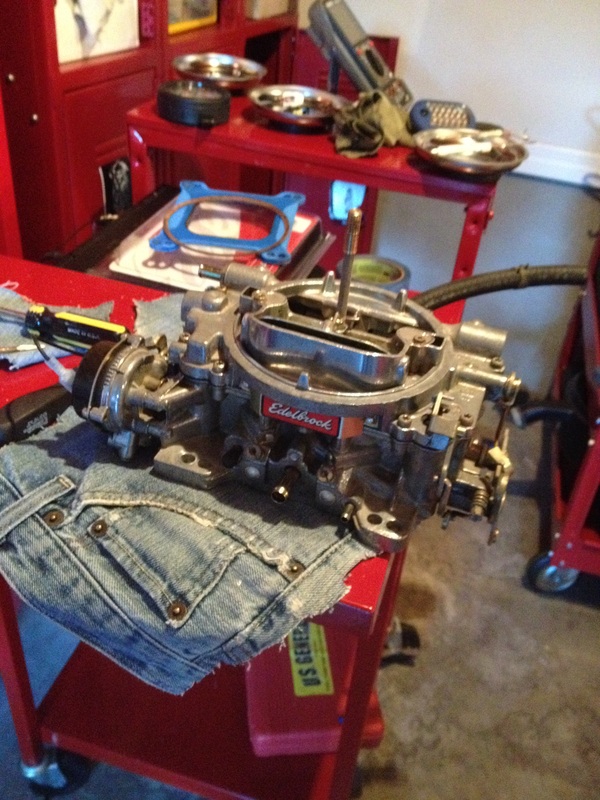
CARBURETOR REBUILD
Edelbrock Performer Carburetor Maintenance Kit - 1477 - 1477 Instructions
Edelbrock Carburetor Float Kit - 1469
Edelbrock Carburetor Float Kit - 1469
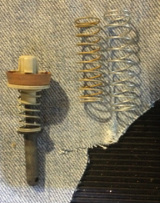
If I only needed one part from the rebuild kit, this spring was it. (#30 Pump Plunger Spring) You don't need a micrometer to compare the lengths of the old spring (left side) to the new one (right side). I don't think that the difference in length was due to a normal spring set over time. From disuse and lubricant drying up, this spring probably got crammed down, and caused a permanent loss of rigidity. If you read the rebuild instructions, this is the only part that is recommended to be oiled. It could also cause the carb to run too rich if the accelerator pump hangs in the down position.
My job requires me to be anal so I can't help but notice little details. For this reason, I saw that some of the gaskets (#33 Primary Venturi Cluster Gasket) in the rebuild kit had different cutouts towards the upper right gasket corner. The new gasket is on the top, and the old gasket is on the bottom in the picture. If you look at the bottom on the cluster, there is a passage that the new gasket follows. My first guess is that this is vacuum passage, but I haven't cared enough to figure out if this makes any difference. All I know is that my car runs well.

The old part was orange and new is blue. (#29 Pump Plunger Cup) The blue cup is supposed to be compatible with newer fuel blends.

The instructions for the 1477 rebuild kit are okay, but there were still a few parts that I still don't know what they are. There are extra parts for different carbs.
LINKAGE / ADJUSTMENT CHECKS
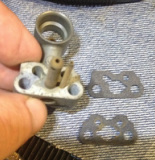
For the most part, I think that most of the linkage measurement checks in the rebuild instructions aren't necessary unless you know someone has messed with them, or you've dropped the carburetor and really messed up the linkages. The only one that I think is EXTREMELY important is the float adjustment. This can cause the bowl to overfill and overflow through the carb.
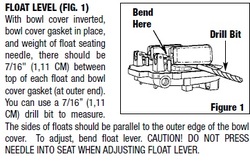
The weird thing about it is that it requires a 7/16" drill bit. For some reason, 7/16" isn't all that common of a size in drill bit sets. I went through three different sets that I had and none of them had that size. Even at Harbor Freight, I couldn't find a set less than $20 that included that size. Being cheap and not needing any more drill bits, I used the drill bit sizes smaller and larger then 7/16" (3/8" and 1/2") to use as "GO" and "NO-GO" gauges just like armorers use to check chamber wear in weapons. It worked really well, and if you have ever had to bend floats to try to get the correct height, you know that bending tiny metal tabs by hand isn't an exact science. If the smaller one just barely slides under the floats, and the larger drill bit doesn't slide under at all, it seems fine to me.
The weird thing about it is that it requires a 7/16" drill bit. For some reason, 7/16" isn't all that common of a size in drill bit sets. I went through three different sets that I had and none of them had that size. Even at Harbor Freight, I couldn't find a set less than $20 that included that size. Being cheap and not needing any more drill bits, I used the drill bit sizes smaller and larger then 7/16" (3/8" and 1/2") to use as "GO" and "NO-GO" gauges just like armorers use to check chamber wear in weapons. It worked really well, and if you have ever had to bend floats to try to get the correct height, you know that bending tiny metal tabs by hand isn't an exact science. If the smaller one just barely slides under the floats, and the larger drill bit doesn't slide under at all, it seems fine to me.
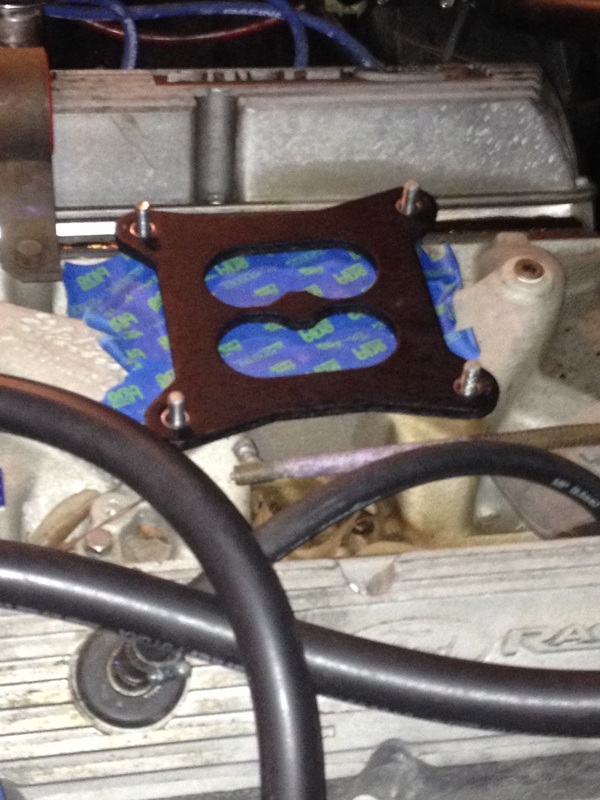
OPEN CENTER SQUARE BORE VS DIVIDED ADAPTERS / SPACERS
I read a lot. It is thought that using a square adapter (without a divider or separate bore holes) will reduce the air velocity through the carb into the manifold. While this makes sense, I read about someone that tried these different combinations on a dyno and the horsepower increases were pretty much negligible. In the Edelbrock install instructions, it says to use the open center gasket on certain Performer manifolds with Performer carbs. Edelbrock does a lot of testing. It's a safe bet they do a fair amount of testing with their own carbs and manifolds, so I will take their word for it and use the open center adapter since I am mating an Edelbrock intake to an Edelbrock carb.
MATING THE CARBURETOR TO THE INTAKE
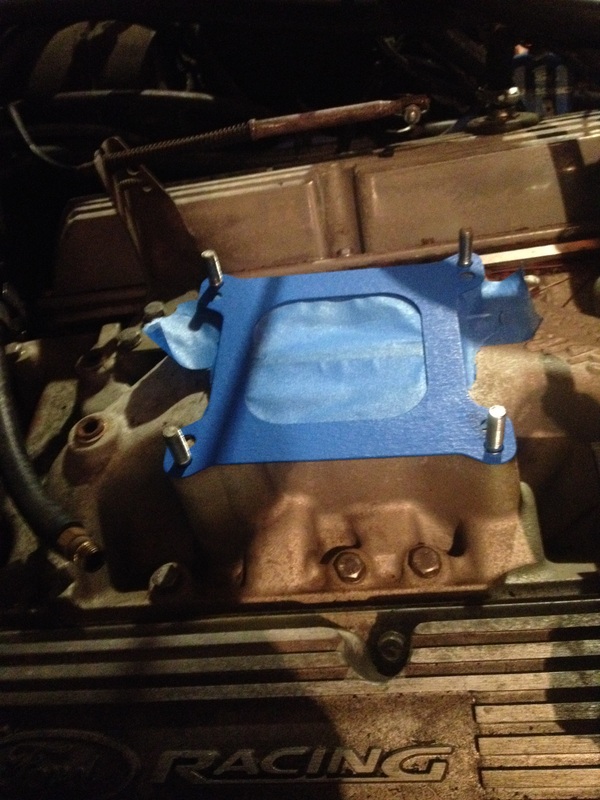

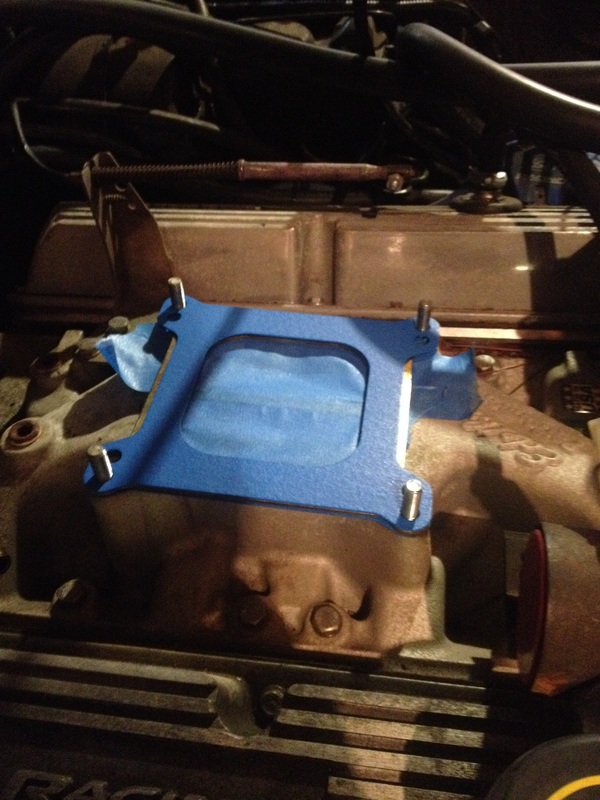
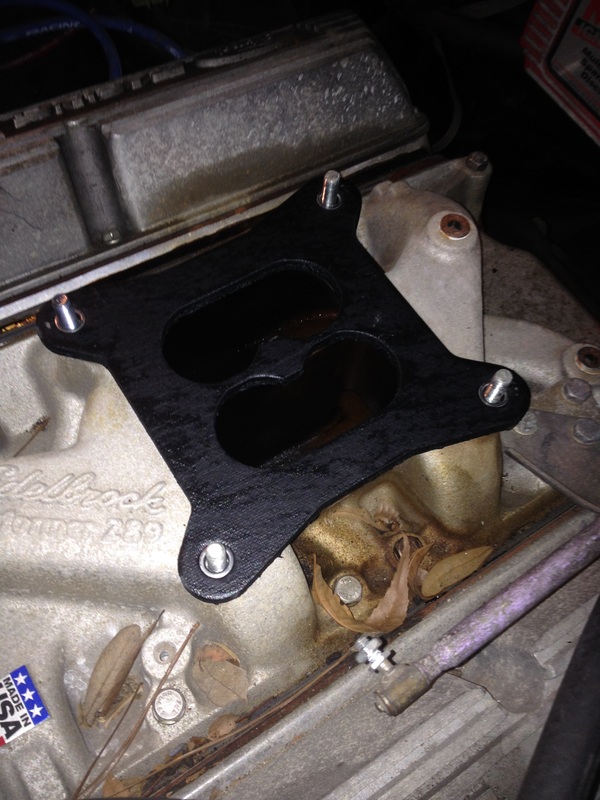
Getting rid of the carb spacer bothered me, so as a compromise to prevent heat soak and prevent vacuum leaks, I decided to sandwich the adapter plate (Square-Bore to Spread Bore Adapter Plate - 2732) with the thicker blue carb base gaskets. I have heard good things about the Edelbrock wood spacer for heat soak, but it seems too expensive and I still have to consider the additional height. If I have to add a spacer in the future, I will add the Edelbrock 9266. It is only about 1/3 of an inch tall and made of nitrile rubber that divides both sides of the carb... exactly like the entrance to the intake manifold. This is actually a heat insulating gasket, but the rubber is stiff enough that when used, the adapter plate is no longer needed, so a small amount of clearance is gained for the spacer to use. You also don't have to use base gaskets anymore.
|
|
Better Success - 19 INCHES OF MERCURY AT IDLE
|
|
|
Since I had to remove the carb again, I finally installed the 9266 heat insulating gasket that I had been meaning to. I didn't get 19" just with the gasket, it took jet/rod changes, and more tuning.
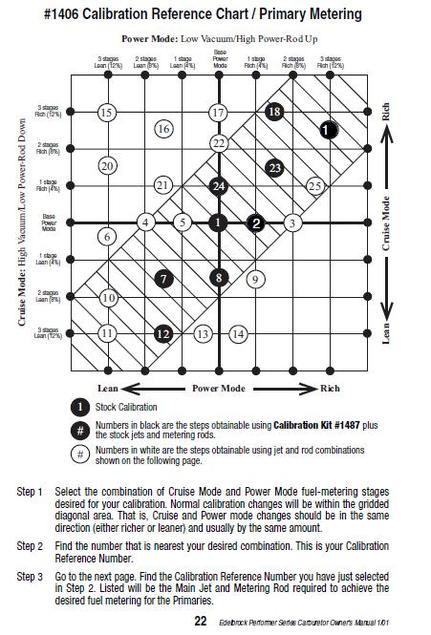
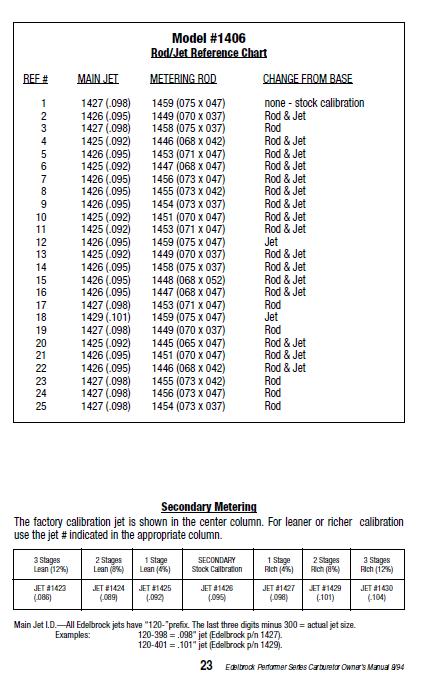
LEAN AN EDELBROCK WITHOUT BUYING ANY JETS
I wish I had thought of this, but I read somewhere an easy way to lean an Edelbrock is to swap the primary and secondary jets. From the Rod/Jet Table below, taking the rear 0.095 to the front it brings it to #12, three stages leaner with the 0.098 jet. Since this doesn't require buying anything, the secondaries get one stage richer with the 0.098 jet.
|
|
INEXPENSIVE TACHOMETER
LCD Automotive Multimeter With Tachometer Kit - 95670
The inductive pickup can't withstand engine heat so don't use it for prolonged periods. Mine worked for about an hour, then started giving nonsense readings. I kept fiddling with regular multimeter leads and settings and started to get RPMs that made sense on the 3 cylinder setting, thought I was going crazy and and wrote it off as a coincidence. It turns out, someone else already figured this out and it works!
1) Set the MM to 3 cylinder Tach
2) Connect MM negative to ground
3) Connect MM positive to the negative coil wire
