SO YOU WANT A FANCY GARAGE FLOORI spend a lot of time in the garage and for me it is much easier to have a clean and organized work area. It's no fun when you can't find a tool or have to tiptoe around an oil spot that has been soaking into the concrete for a few months that won't clean up. Putting cat litter or sand on top of an oil spot on concrete only prevented it from getting tracked around to other areas. For a long time, I kept going back and forth on whether I wanted to epoxy the floor. After reading good and bad reviews, the only way I could guess to keep an epoxy floor in decent shape is to apply a clear protective coating, not drive on it with hot tires, and place cardboard underneath tires, jack stands, etc.
Every other time I go to the hardware store, I check out the paint section where the floor coatings are, hoping that some new miracle product has come out that can take the abuse that happens to a garage floor. |

|
WHAT I WAS LOOKING FOR IN A GARAGE FLOOR COATING
-Not a lot of prep work (not epoxy)
-Easy to apply (not epoxy)
-Able to do in sections at different times (not epoxy)
-Able to handle driving, jack stands, metal engine hoist wheels
-Easily clean up oil stains (pool up on surface, that can be wiped up)
-Able to be touched up (not epoxy)
-Not slippery
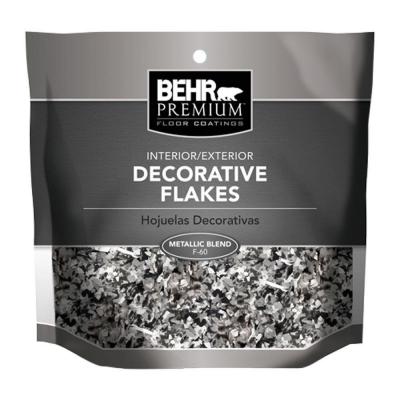
-Color Flakes
-Glossy
-Inexpensive
-Easy to apply (not epoxy)
-Able to do in sections at different times (not epoxy)
-Able to handle driving, jack stands, metal engine hoist wheels
-Easily clean up oil stains (pool up on surface, that can be wiped up)
-Able to be touched up (not epoxy)
-Not slippery
-Color Flakes
-Glossy
-Inexpensive
EPOXY ADVANTAGES
-Color Flakes can be added
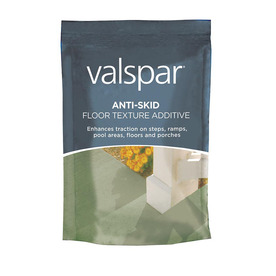
-Anti-Skid granules can be added
-Professional look if done right
-Anti-Skid granules can be added
-Professional look if done right
EPOXY DISADVANTAGES
Epoxy requires a lot of prep work. Cleaning, degreasing, and etching. I haven't ever used epoxy on floors, but from what I have read the prep time is the bulk of the time spent doing the floor. Even then it can still lift up with hot tires. Since it's a two-part epoxy, the working time is short and it isn't really easy (or possible?) to repair a damaged area.
There are some really durable floor epoxies, however the best ones are only available to contractors. They cost two to three times as much and are not the same as the ones sold in big box stores. If you want to pick out a quality epoxy, it should have a high solids content. The solids are what is not evaporated away when the coating has cured or dried. A lot of the less expensive coatings have a lot of components that evaporate, and what you are left with is less material on the surface.
I have read some horror stories about having to redo an epoxy floor that didn't hold up. Most contractors will outright refuse to redo an epoxy job. It seems the proper way to redo an epoxy floor is to use a diamond grinder and completely remove the epoxy layer and start from scratch. That doesn't sound fun. This was enough for me to stay away from epoxy.
What surprised me is that there are clear coatings made to go on top of epoxy, and those are not included in the kits. They aren't cheap either. This may not be correct, but I think of garage floor epoxy as a layer of plastic that sits (or glues, hardens) as a solid layer on top of concrete that you pray will bond to the surface. Since there are already great paints that have proven to bond to concrete, if the color layer has to be protected with another coating, why not just use paint?
What I ended up doing is painting, flaking and then coating with polyurethane. After I came up with the idea, I searched the web and couldn't find anyone who had done this in a garage. I was worried about durability, and started looking at contractors and pictures of work that they had done. I saw some beautiful polyurethane floors in commercial buildings, but I couldn't find one that admitted to using paint underneath. I doubt that I am the first one that has done this, but for whatever reason, I couldn't find any info. I actually found info that polyurethane over paint was a bad idea in most cases (not relating to floors, just in general).
WHAT THE HECK KIND OF PAINT IS $16 PER GALLON?
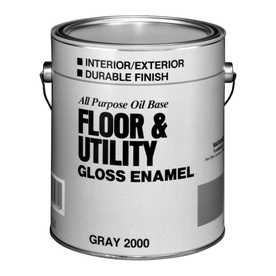
When looking at the floor coatings and epoxies at Lowe's, I noticed a plain looking can with a generic label that said "Floor and Utility Paint." The thing that drew my attention was that it was only $16 per gallon, so I read the back.
It's an oil-based gloss enamel that is made for wood, metal, and concrete surfaces. It also mentioned on the back directions for adding anti-skid granules. It is self-priming and actually made for floors. It seemed too good to be true.
Being a fan of oil-based paint, and wanting to make this work, I had to figure out a few things. First, if I was going to spend all this time covering the garage floor, I wanted to go up the walls and cover the exposed concrete foundation. Second, I wanted oil and fluid spills to clean up easily, and lastly I wanted to it have the pretty paint flakes and hold up to heavy wear.
POLYURETHANE
|
I bought a gallon of the floor paint and wanted to test it. The garage concrete floor has many imperfections and stains. A glossy coating would make them stand out, so the paint flakes will mask them well. An advantage of a glossy coat is that it will reflect light, which can be helpful if you are underneath a vehicle.
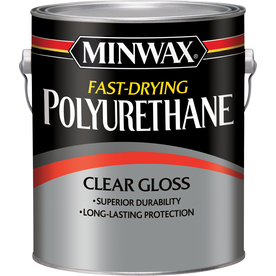
If you look at industrial floors at car dealerships, shops, and factories, they usually aren't coated with epoxies. They are coated with polyurethanes. After I read A LOT about the best way to cover a shop floor, the best way is to use an industrial-grade epoxy to fill in cracks etc, then cover and protect with a polyurethane. Polyurethane is actually more durable than an epoxy and will resist blunt impacts the best. It forms a hard layer, and since it is oil-based... Minwax 1-Gallon Fast-Drying Gloss Polyurethane Minwax 1-Quart Fast-Drying Gloss Polyurethane Minwax Half-Pint Fast-Drying Gloss Polyurethane |
The oil-based enamel floor paint will stick to the concrete and hold the anti-skid granules and paint flakes. The oil-based polyurethane will bond to the oil-based paint and provide an even glossier, more durable finish. Since the polyurethane layer is very thin, the skid granules and paint flakes still form a raised surface.
I chose an oil-based clear gloss polyurethane that is made for hardwood floors. This kind has an amber tint to it, and yellows in sunlight, but that's how you can tell it is durable. A polycrilic coating is truly clear and doesn't yellow, but I opted for the polyurethane because I was making this up and trying to make it as durable as possible.
I chose an oil-based clear gloss polyurethane that is made for hardwood floors. This kind has an amber tint to it, and yellows in sunlight, but that's how you can tell it is durable. A polycrilic coating is truly clear and doesn't yellow, but I opted for the polyurethane because I was making this up and trying to make it as durable as possible.
ADDITIVES
THE PROCESS
After some testing, I came up with a method that I liked best. I wiped up oil stains with a rag and swept the floor pretty good. There was still some dust and dirt left on the floor, which I mixed in during painting as a ghetto anti-skid additive.
1) PRIMER PAINT COAT
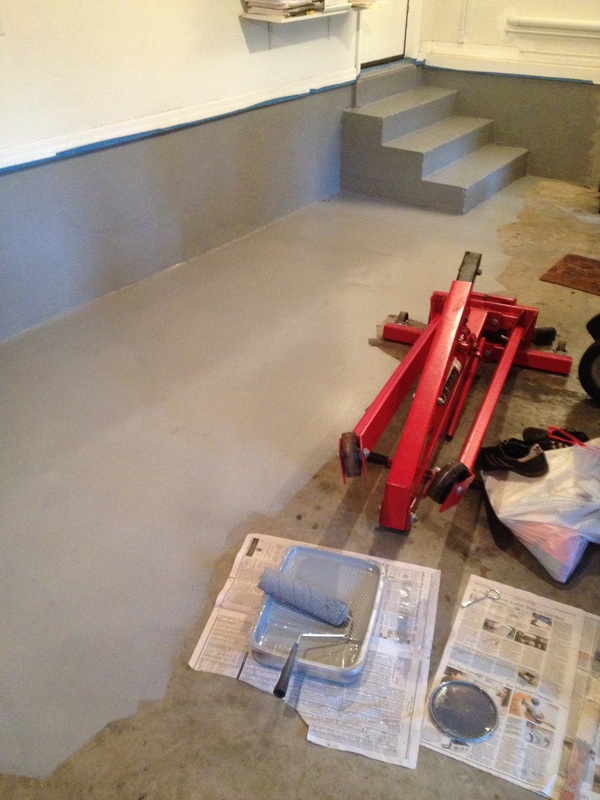
I painted a plain primer coat of paint on the walls and floor that was thick enough to cover over the colors and stains underneath. Let it dry for 24 hours. This is an oil-based paint, so layer it on like an old-fashioned oil paint.
2) TOP PAINTCOAT WITH ANTI-SKID AND COLOR FLAKES
Mix the anti-skid granules into the paint can and do a second coat. Right after the second coat has been painted, flake the floor and let it dry for 24 hours.
3) FIRST POLYURETHANE COAT
Roll a thin layer of polyurethane over the flaked and anti-skid paint. Let it dry for about 5 hours or until it is dry to the touch.
4) FINAL POLYURETHANE COAT
Roll another thin layer of polyurethane over the first and let dry 24 hours before walking on it. Wait at least an extra day before putting heavy objects over it.
OIL STAINS AND CONCRETE CRACKS

Those are oil stains.
|
First coat of paint.
|
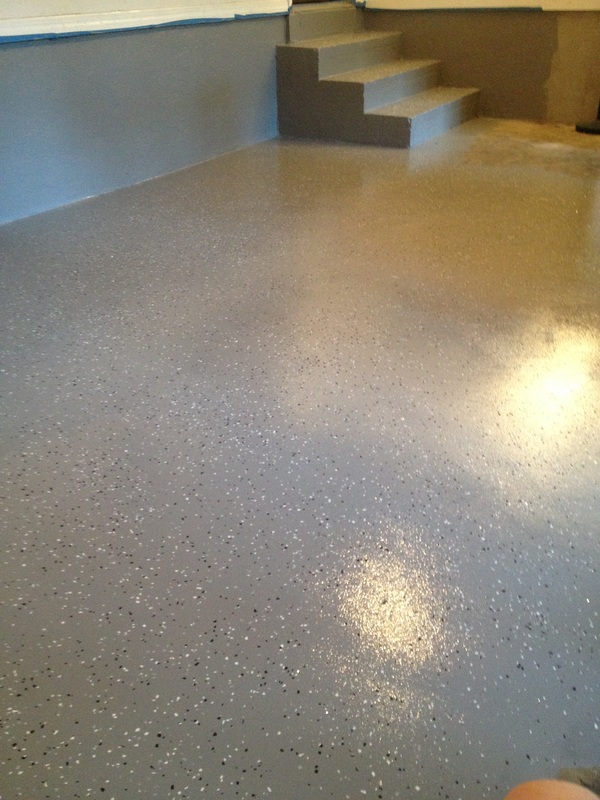
Flaked and poly-ed.
|
I actually left a small puddle of oil on the floor and painted over it to see what would happen. Over a small stain, it will cover it nicely. Over a wetter, larger spot, it will take a long time to dry (if it ever does) and anything that comes in contact will stick to it so basically the stain is still visible. The great thing is that the paint and oil don't dry but mix and become tacky... scrape up the stain until all the tacky oil and paint mixture is gone... then paint over it. It only took one scrape and repaint to get rid of a small oil puddle that I painted over.
For cracks, I loaded them with paint on the first coat. I wasn't worried about getting it perfect, but if you do, you may want to apply more coats after the paint has dried to completely level the crack.
For cracks, I loaded them with paint on the first coat. I wasn't worried about getting it perfect, but if you do, you may want to apply more coats after the paint has dried to completely level the crack.
COVERAGE
3 oz Anti-Skid Granules : 1 Gallon Paint
1 Gallon Polyurethane will cover about : 4 Gallons Paint
1 Gallon Polyurethane will cover about : 4 Gallons Paint
I used 4 1/2 gallons of paint to cover the walls and floor, and just over one gallon of poly. Since I tested out different thickness with the poly, I could have got away with only using one gallon if I wasn't messing around.
The walls and primer paint coats didn't have any anti-skid granules mixed in. I added 3 oz (one package) per gallon for the top paint coat of the floors. No granules were added to the poly either.
I used about 3/4 of a pound of paint flakes. It was a one pound bag, so I had some leftover. It's a personal preference how much flake coverage you want. I didn't go that heavy because I want to be able to easily find small parts that fall on the floor.
LESSONS LEARNED
Slippery - Flakes actually do help with grip. If the floor is painted with just the paint and no paint flakes or anti-skid granules, it will be slippery when wet.
I used a 9" 3/8 nap roller for the paint, and a 4" foam roller for the polyurethane, both were Harbor Freight cheap quality so I could throw them out instead of clean them.
This is more important for the poly layer, but I did it for the paint also. I rolled the coating at least three times. The first roll to get the paint on the surface, a second roll about 45 degrees from the first to make sure there is complete coverage, and a third roll perpendicular to the first to really smooth out the coat. I tried to do the last rolls for an area all in the same direction.
This paint has stronger fumes than you would expect. Good ventilation will help, and speed up the drying time. Moving a box fan around works great.
The paint has to be mixed well. When the can is first opened, it looks brown and not gray. Mix it until it is uniformly gray, then keep mixing until it is nice and creamy. If it seems to be going on too thin, stir it more. It goes on thick.
Mix in the anti-skid granules gradually as you are mixing the paint, otherwise they may clump together.
If you put on too much poly and it pools up, the ambery, yellow color will really show. You don't need much poly.
The paint alone can withstand direct hammer blows, but it will leave marks if you hammer the claw end of the hammer into the paint. The poly makes it much more durable.
The paint alone is easier to clean than concrete, but it gets dirty fast and the dirt stands out. It is easiest to cover the paint with poly before it gets all dirty and it has to be cleaned. Look at the picture below. See the footprint on the side that is only painted?
PAINT ALONE (TOP RIGHT CORNER) VS POLY COATED (BOTTOM LEFT CORNER)
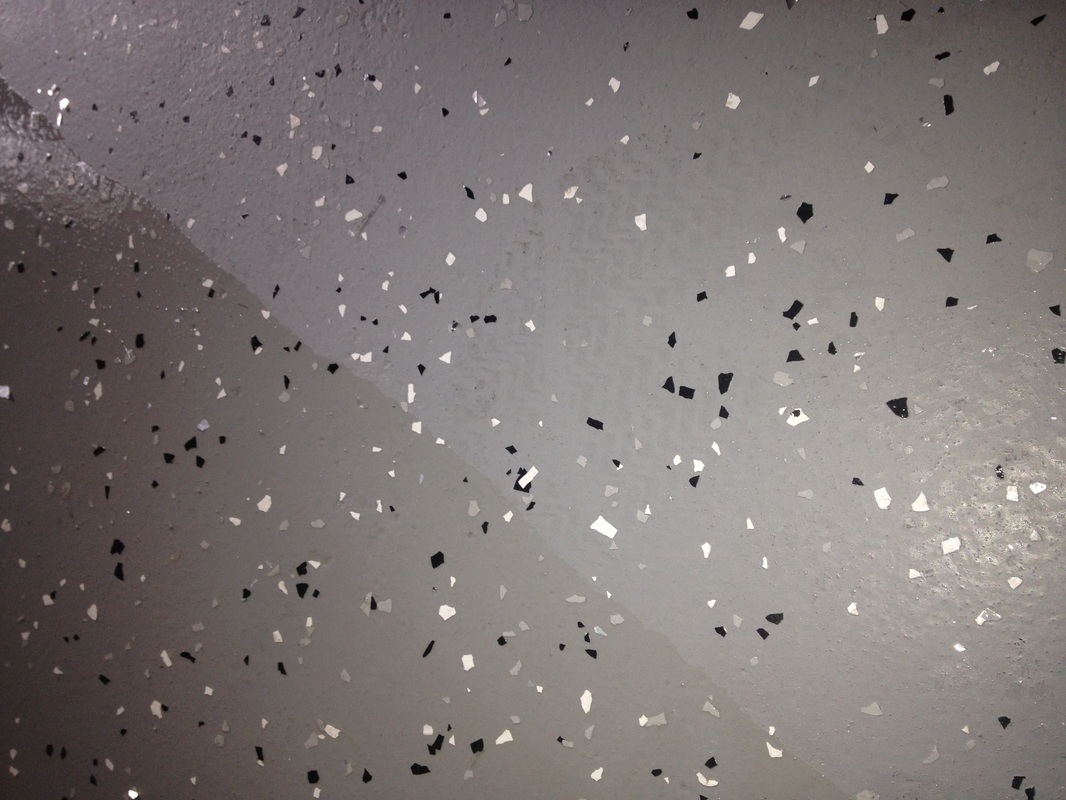
The polyurethane coated surface is extremely easy to clean and makes it easy to sweep. For this reason, I think it would be extremely slippery if there weren't any additives. If you look closely in the picture above, you can make out the anti-skid granules.
Good lighting is helpful when applying the poly. Since it is clear, it can be really hard to tell what has already been covered when it's wet.
I did the floor in sections, which isn't a problem for the paint. If you want a perfect uniform coating, you must apply the poly layers at the same time. If you are really careful, you can blend a dried poly layer next to a wet one. A single poly layer applied evenly to the entire area will dry in a uniform color.
Since it was going to rain, I only waited about 24 hours before I drove a 4-wheeler onto the fresh poly coat. I put cardboard under the tires, and where the tread compressed onto the cardboard, it soaked up enough poly off the floor for me to notice but not really care. Even if it feels dry, the polyurethane will take a couple days to fully cure.
The paint can take up to 30 days to cure (not just dry) if it isn't top-coated. Since I immediately covered the dry (not cured) paint with poly, I'm not sure if waiting 30 days would be beneficial. This is just a guess, but I think that since the poly is so thin and sticks to the paint, the paint is still curing through the poly layer, but slower.
TOUCH-UP AND REPAIRS
I haven't had to do this yet, but if the time comes it should be easy. The polyurethane and paint can both be sanded, or the entire coating can be painted over, re-flaked and re-polyed. If there is a next time, I will probably just use the existing layers as a base and build up on top of the surface again.
